
Not sure where to start? Download our free Kitchen Readiness Checklist — a step-by-step task list you can work through before reaching out to kitchens.
So you’re starting a food business and you’ve just learned you need a licensed commercial space to produce your food legally. Welcome to the world of shared kitchens.
Shared-use kitchens — sometimes called commissary kitchens or incubator kitchens — rent space by the hour, day, or month to multiple food businesses. Think of it like a coworking space for chefs, caterers, food truck operators, and packaged food producers. They offer low startup costs, flexibility, access to commercial equipment, and often a built-in community of fellow food entrepreneurs.
But you can’t just walk in and start cooking. Shared kitchens are selective. Operators want members who are prepared, professional, and serious about their business. The more ready you are before you reach out, the better your chances of finding a great fit — and getting approved quickly.
This guide walks you through eight things to do before you join. We’ve broken them into two phases: what to handle before you start contacting kitchens, and what to sort out once you’re ready to book time.
TL;DR
- ✅ Define your business model and plan
- 🏛️ Register and license your business
- 📋 Understand your regulatory requirements
- 🛡️ Get the right insurance
- 💰 Nail down your true operating costs
- 📅 Build a production and scheduling plan
- 👋 Introduce yourself to your health inspector
- 💪 Commit to the work
Download the Kitchen Readiness Checklist to work through each step.
Before You Start Contacting Kitchens

1. Define Your Business Model and Plan
Before you approach any kitchen, you should be able to clearly explain what you sell, who you sell to, and how you make money. Kitchen operators want to understand whether your business fits their facility, schedule, and community — and they want to know you’ll still be paying rent a few months from now.
Be ready to articulate:
- Your product(s) and format (packaged food, catering, pop-ups, delivery-only, wholesale, etc.)
- Your primary sales channels (direct-to-consumer, delivery apps, retail, farmers markets, events)
- Your target market and who your ideal customer is
- Your pricing strategy, even if it’s preliminary
- Your anticipated production volume and growth trajectory
- A 6–12 month financial projection
Writing a business plan — even a one-page summary — isn’t just for impressing other people. It’s a way to pressure-test your own assumptions and identify challenges before they become expensive surprises. Resources like the SBA’s business plan guide or the Business Model Canvas are good places to start.
2. Register and License Your Business

To sell food legally, you need to register your business with your local government. This means:
- Choosing and registering your business entity (LLC, sole proprietorship, etc.)
- Obtaining an EIN from the IRS
- Filing a DBA if you’re operating under a name different from your legal business name
- Opening a dedicated business bank account
- Applying for a business license through your city or county office
A note on your business address: it’s tempting to use a home address, but keep in mind that your shared kitchen address will likely be where you receive ingredient and packaging deliveries. Using that same address for your business registration keeps things consistent for tax purposes and avoids complications down the line.
Average LLC setup costs range from $50–$500. Services like LegalZoom can streamline the filing process.
3. Understand Your Regulatory Requirements
Food safety compliance is non-negotiable — and shared kitchen operators often act as an extension of the health department. They need confidence that you understand your obligations before you ever set foot in their facility.
Before applying, you should know:
- Which permits apply to your specific business model (food trucks, caterers, and wholesale producers are all regulated differently)
- Whether your state has cottage food laws that affect what you can produce and where
- Your local health department’s inspection process and what they’ll want to see
- Labeling requirements for your product type
At minimum, you’ll need a Food Handler’s Certificate — or in many cases, a ServSafe Manager Certification — before you can produce in a commercial kitchen. The ServSafe Manager course is a single-day certification that costs around $195 and is valid for three years. If you’ll have staff working alongside you, they’ll need to be certified too.
Your local health inspector is one of your most valuable allies. Reach out early, introduce yourself, and ask questions. They want you to succeed — and building that relationship before your inspection makes everything easier.
4. Get the Right Insurance

Most shared kitchens require proof of general liability and product liability insurance before you can book a single hour. Policies typically need to:
- Carry a minimum of $1 million in general liability coverage
- Name the shared kitchen as “additionally insured”
- Cover off-site sales, delivery, and events (confirm this with your provider)
Policies generally run $300–$500 per year. We recommend the Food Liability Insurance Program. heck out our special partner rates to get a competitive policy with low premiums.
Before joining a kitchen, confirm their specific coverage requirements and make sure you understand renewal timelines and documentation requirements.
Before You Start Booking Kitchen Time
Once a kitchen has accepted your application, there are a few more things to sort out before your first production day.
5. Nail Down Your True Operating Costs

Shared kitchens aren’t just hourly kitchen fees. New members are often surprised by the full range of costs involved. Beyond your rental rate, factor in:
- Security deposits (often required upfront)
- Storage fees — dry, refrigerated, and frozen are typically separate
- Orientation or onboarding fees
- Cleaning, waste, or utility surcharges
- Transaction or technology fees if the kitchen uses booking software
Build a realistic startup budget that accounts for your first month’s kitchen rental, initial ingredient and packaging inventory, insurance premiums, permits and licenses, and at least 3–6 months of cash reserves.
Understanding your true cost per production run is what allows you to price your product confidently — and catch cash flow problems before they become serious.
6. Build a Production and Scheduling Plan
Shared kitchens run on schedules. Operators value members who are predictable, communicate clearly, and respect that other businesses depend on the same space.
Before your first booking, have a clear sense of:
- Your preferred production days and times
- How many hours you’ll need per session
- How far in advance you’ll plan and book your production runs
- Whether you’ll need to receive deliveries at the kitchen, and on which days
Ask about off-peak rates — working during less popular time slots can sometimes come with a discount. And always account for prep, setup, cleanup, and receiving time when estimating how many hours you need.
Members who plan ahead are easier to schedule — and typically earn more flexibility over time.
7. Introduce Yourself to Your Health Inspector
Many health departments will want to visit you in your new production space before you’re operational. They’ll want to review your production methods, food storage setup, and general workflow — and they’ll expect you to have documented standard operating procedures and critical control points for your products.
Walk them through:
- Your recipes and production process
- How you plan to hold food (times and temperatures)
- How you’ll package and distribute your products
- Where and how you’ll store ingredients and finished goods
Keep all of this organized in a single folder — digital or physical — so you’re ready when they come. Your inspector is a resource, not an adversary. The operators who treat that relationship well tend to have smoother inspections and fewer surprises.
8. Commit to the Work
Running a food business is genuinely hard. Margins are tight, mistakes have consequences, and the early months demand more time and energy than most people anticipate. Shared kitchens are also collaborative environments — you’re sharing space, equipment, and sometimes cold storage with other businesses. Success depends on following shared rules, communicating proactively, and showing up as a respectful member of the community.
Before you take the leap, ask yourself honestly: Do you know where you want this business to be in a year? Do you have a plan for when sales are slower than expected? Are you ready to be both the chef and the business owner?
If the answer is yes — you’re ready.
Ready to Take the Next Step?
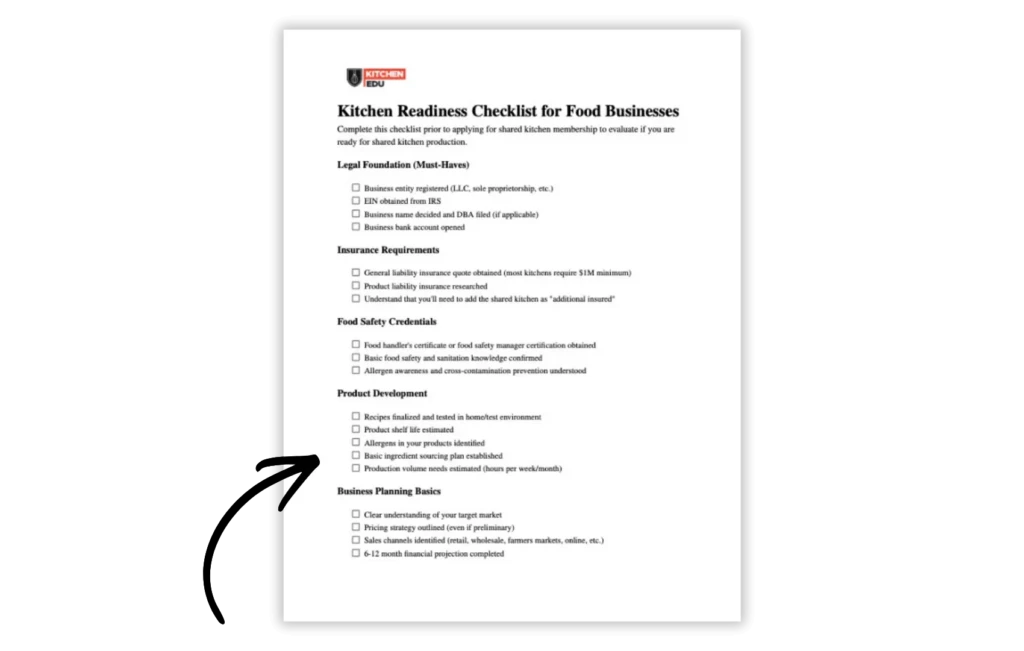
Use our free Kitchen Readiness Checklist to work through each of these steps with a full task list — including questions to ask during kitchen tours and a financial readiness checklist to complete before you apply.
Once you’re ready to find a kitchen, visit The Kitchen Door to search for shared kitchens by city or zip code. And explore The Food Corridor for more resources to help you grow.